Hack The Box: Epsilon
What will you learn? Epsilon is a medium rated retired Linux machine that showcases the exposure of a GIT directory on a webserver that contains sensitive hard-coded information such as AWS credentials that interacts with AWS Lambda. Lambda allows us to obtain function code that exposes cookies that can be used to impersonate a privileged user session on a target web application. We are able to exploit Server Side Template Injection (SSTI) in order to obtain a foothold and the features associated to a scheduled task to elevate to the root user. This is another entry in the cloud track on the Hack The Box that I am excited to move forward with.
Let’s begin enumerating the target:
The following interesting ports are open: 22 (SSH- visit later if we obtain credentials), 80 (GIT hosting webserver), and 5000 (a unique web application):

We have some interesting stuff- minimally speaking on the port 5000 web server. Hosting a login page, not much to it. We should begin searching for subdomains / subdirectories with tools like dirb, gobuster, ffuf, etc in order to find more information.

This is all there is to find. This is not useful to us really, as with what we do next I already tried to include it in the URL where I will be using a tool and it only works against /.git

We will install a tool called GIT-DUMPER in order to pull down the source code from the exposed /.git repository. I used pip3 install git-dumper and appended the additional argument to the end in order to let PIP not be upset at me for using the root user.

Now we’re able to dump the exposed /.git directory using the tool. I am calling the repository we’re copying locally ‘dumped’. This is a really good resource for seeing what options you have for this tool and other means of using it: https://exploit-notes.hdks.org/exploit/web/dump-git-repository-from-website/
This leaves us with a lot of stuff to comb through. My thought process goes to looking at older commits and history of said commits in this directory, and reading any configuration files that stand out or leftover artifacts etc.

Super cool flask program examination:
This Python script sets up a basic web application using Flask with JSON Web Token (JWT) authentication to restrict access to certain routes. There are a couple problems here- including hardcoding admin:admin (even though it doesn’t work on the port 5000 web application). There is a static JWT (JSON Web Token) being used so theoretically if we can find information relevant to that we may be able to obtain the secret key mentioned below near the top.

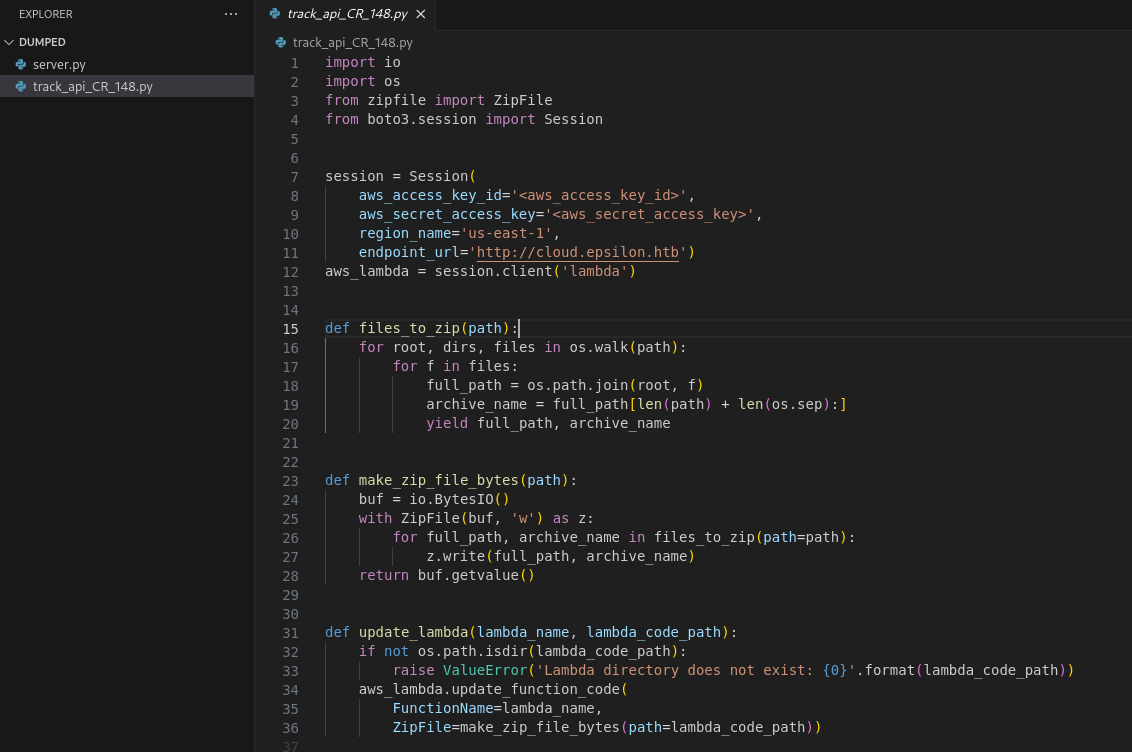
Now we will take a look at our second revealing file for the web application on port 5000. This script uses AWS Lambda's API to update a Lambda function's code by zipping up files from a specified local directory and uploading them to a custom AWS-compatible endpoint (cloud.epsilon.htb). Any AWS credentials that could be exposed are masked here, there is nothing out in the open in these files necessarily.
Since we have a pulled GIT repository we can look at the history of commits and begin gathering an understanding of what has occurred in the lifetime of this project.

If we look at the first commit (lowest one on the screen) we can see an exposed AWS access key ID and secret key!

After obtaining these keys we can now use the AWSCLI (AWS) command line utility to interact with the target. If you type aws you should be able to install the command line utility I am talking about. We can configure our AWS utility to interact with the target endpoint by using the IDs we obtained.
After configuring AWS to interact with our endpoint we can list all the functions that AWS-LAMBDA as a service has to offer on this machine running localstack.

Now that we know the name of the function we can actually list the location where that function resides on the target. That will allow us to then use wget against that location and curl the source code of the lamda function back to our localhost.

This reveals the function source code to us. When we open it we can see that we have retrieved the ‘secret’ that is used for the API GATEWAY. This could be the same ‘secret’ used for the flask application on port 5000 too. We are aware of the cookie format of JWT from before in the other Flask application source code we examined.

We can use Python in order to create a cookie that uses the information we’ve obtained to then test it against the web application with the same formatting that we saw in server.py

We can take that cookie we generated, name it ‘auth’ and make the value equal to the JWT we created which will allow us to access the /home page.

We are now able to access the home page of the web application as the ‘Admin’ user.

Initial Foothold (USER):
Reviewing the server.py file we are able to find Server Side Template Injection (SSTI) in the /order function at the bottom. The SSTI is present in this line of code: tmpl = render_template_string(message, costume=costume)
The costume parameter is placed directly in the template string without any input sanitization making this vulnerable to Server Side Template Injection. Let's place an order and capture the request in burp suite. Replace costume value with {{ 7*7 }} to test for SSTI. We are looking for a return value of 77777 or 49.

We can open Burpsuite and navigate to the /order page. We can put random values into the fields where we will then intercept the request in our proxy and send it to repeater. Then we can go to the costume field and replace that value with {{7*7}} to test. When we send the “payload” and and examine the response we will see ‘Your order of “49” has been placed successfully!’.
Now we can look for payloads on payloads all the things and attempt to get remote code execution (RCE).

I am not sure what the back-end application is- I understand there is a chart type reference out there somewhere to narrow it down. I used: https://github.com/payloadbox/ssti-payloads for the payload of {{config.__class__.__init__.__globals__['os'].popen('ls').read()}} to confirm RCE.

Now I need to input where ‘ls’ is a basic BASH tcp reverse shell. Below is my initial process before converting to another way of doing this as it did not work but it sent through.

The other way of doing it is using the Jinja2 Template Format- I found the payload here: https://book.hacktricks.xyz/pentesting-web/ssti-server-side-template-injection after seeing a 0xdf writeup where he used this because I was not understanding why my method was not working. We are also using a common accepted port such as 443 (or 80) that most targets have exceptions for which may also contribute.

Privilege Escalation (ROOT):
Great, we landed a shell as the user Tom. Now we can start enumerating the target - especially configuration files or anything that may include hard coded credentials. You can upgrade to a full TTY if required with this source: https://book.hacktricks.xyz/generic-methodologies-and-resources/reverse-shells/full-ttys

There is not much going on that we’re going to be able to find on the manual enumeration side- so we can begin looking at the running processes / jobs as ROOT in the background with PSPY64. Spinning up a Python3 web server and serving it to our box in the /tmp directory where we have adequate read / write permissions to do so.


Then we can make it executable with chmod +x pspy64 and run it using ./pspy64 and start looking at what is going on in the background. There is a pretty interesting backup.sh script running in the /usr/bin/ directory on what may be every minute- as UID: 0 (root).


The backup.sh script has the permissions -rwxr-xr-x, which means it is executable by all users. However, it is owned by root, indicating that only the root user can modify it.
The script performs backup operations that include:
Delete all files in the
/opt/backupsdirectory.Backup the contents of the
/var/www/appdirectory and save them in/opt/backups/<int>format.Create a SHA1 checksum of the tar file and save it to a checksum file, granting all permissions to this file.
Pause for 5 seconds.
Create a tar file containing the previous tar file and the checksum file, then move it to the
/var/backups/web_backupsdirectory.Delete all files from the
/opt/backupsdirectory again.
The second tar command uses the ‘h’ flag which fetches the content of symlinks and does the compression. Because of this we can remove the checksum file and place a symlink to the SSH key of the root user (id_rsa).

Save this script as explot.sh and run it in a while loop: while true; do ./exploit.sh; done.
Then copy latest time stamp .tar file from the /var/backups/web_backups folder and extract the contents. Then cp <time>./tar /tmp;cd /tmp and tar -xvf <time>.tar; cat opt/backups/checksum. Now that we have successfully acquired the ID_RSA (SSH key) for the root user we can change use that to escalate to root.

After updating the permissions on the key to 600 we are able to SSH in as the root user and we have successfully rooted this machine.
