Hack The Box: SINK
What will you learn? Sink is an insane rated retired Linux machine that features a web application vulnerable to an HTTP Desync attack (HTTP Smuggling). It also features local stack which allows us to have a cool virtualized environment demonstrating a mimicked instance with AWS CloudWatch, AWS Secrets Manager, and AWS KMS (Key Management Service) for us to exploit. I chose this as part of my continued mission to get exposure to cloud penetration testing tactics and techniques and it definitely delivers!
Let’s begin with our enumeration on the target:
Ports of interest on the machine are 22(SSH), 3000 (PPP), and 5000 (HTTP)

SSH will be interesting later if we obtain credentials to test against it. For now the most important path to test against would be port 3000 / 5000 for the web surface. Upon visiting port 3000 we can see (NMAP mentioned this as well) that it is hosting ‘Gitea’. I also checked Wappalyzer in the background to see if any quick service versions get picked up but got nothing interesting.

I went to ‘sign in’ to attempt to create a user account. I was not able to. After clicking on ‘Explore’ and ‘Users’ we are able to find three user accounts on the website. This is helpful for our information collection effort. We should create a text file of user account names for later. Now we can begin enumerating these user profiles / repositories. Also at the bottom we can see it is running ‘Gitea Version 1.12.6’

I browsed through all of these user profiles. They have nothing public that is tied to their accounts. Often times with GIT repositories of any kind we can find exposed deployment guides, scripts, hard-coded credentials, etc. I found none of that here. We are also able to repeat this process on the organizations page and see ‘Sink_Solutions’ but nothing else too.

On port 5000 we can see there is an area to login and button to sign up. We are able to sign up on this website.

I created a user account of test, email: test@test.com, and password of testtest. Then I was successfully logged into the website where we can begin repeating the enumeration process. We can see we have two other user accounts administrator and admin@sink.htb too for our user list that is ever-expanding.

At this point we can notice a number of input fields where we can see comments on the first page and notes on the Notes page. We should test for Cross-Site Scripting (XSS), Server-Side Template Injection (SSTI), and SQL Injections (SQLi) and do all of this testing with burpsuite to catch all the responses.
A good way to test for XSS / HTML Injection would be submitting <b>bold</b> as a comment to see if the page renders the bold text. Then if it does proceed with trying to request a document.cookie through XSS to see if any session cookies from other users could be taken. On the SSTI side we can attempt {{ 7*7 }} to see if that spits out seven 7’s or 49, which fails, so its not SSTI either. We could also try fuzzing for Indirect Insecure Object Reference (IDOR) by appending to the notes page http://10.10.10.225/notes/1 and increasing the note to try to find ones that exist. Per the SQLi we could attempt to add ’ to our username while logging in and other SQLi payloads, into input fields too.

NMAP spit this out but the server also responds with it as running: Gunicorn/20.0.0. Gunicorn is a Web Server Gateway Interface (WSGI) HTTP Server for web application deployments. The via: haproxy is interesting, this is a ‘high availability’ proxy that stands in front of Gunicorn. This IP address is checking multiple web servers so if one goes down it sends it to the next one. It is worth now searching for Gunicorn Haproxy exploits.

To understand HTTP Smuggling and execute on the proof of concept here: https://blog.shoebpatel.com/2020/05/18/DefCon-CTF-2020-HTTP-Desync-between-HAProxy-Gunicorn/
If we send an incomplete request to the proxy server it reveals the version in the response header of 1.9.10. This is something you could theoretically do with netcat as well for banner grabbing service versions / information see below for both.


Now we can find a great source for HAProxy HTTP request smuggling.

HAProxy offers Transfer-Encoding header over Content-Length when passing the requests to backend servers. If we manage to append a vertical tab to it then it processes the requests based on the Content-Length header. The duality of HAProxy processing Content-Length and Gunicorn preferring Transfer-Encoding is what enables us to exploit the HTTP Desync vulnerability.
The DevOps post is written by Administrator and there is also an email address of admin@sink.htb so it is possible that the Administrator user is present in the application. Under this assumption, it is possible the administrator user is performing actions on the same application, where we can perform the request smuggling attack to either steal his cookie or reveal sensitive information.
To get started with the proof of concept we will intercept a request of posting a comment or saving a note and forwarding it to repeater.

We will need to import the vertical tab character. Below are the steps to doing so. Notice in the man ascii page we can see that a vertical tab character is hex for 0b. We can combine printf and base64 to create a tag of Cw==. Then we can create a new entry in the Request of Transfer-Encoding: where we will put out vertical tag.


Copy and past the base64 encoded tag where you see it in the request below. Then highlight the Cw== and right click > convert > decode as base64. Then it will disappear but the vertical tag still logically still be present. You can see that as I highlight the text, on the right in the inspector window 0b appears.


Because we added that vertical tab, HAProxy is going to ignore the Transfer-Encoding header and obey the Content-Length:. Then we will put a 9 above the note=test because it is 9 characters and a 0 below it to conform with the chunking. Then we will practically duplicate what we are sending and include a blank note field at the bottom with a Content-Length: 300 so we allow someone else as they request to the server to write to what we have waiting for them. This should create posts on their end for us to see where we’re able to view our own posts. Notice everything no longer included is non-essential.

Now we are seeing that text was appended to that other request we had following our own that got sent to Gunicorn. Mentioning posts that were deleted by another user internally. We can update the stored cookie in session field in the browser and reload the page to become the admin@sink.htb user.

Now we can see the admin user’s posts. Opening each one will reveal the following information (posted now in a notepad).

Now we can go back to GITEA and test our new user / password combinations against the web application to see if we can login over there, as we’ve certainly exhausted the functionality of this web application.

Trying these username and password combinations against SSH fails but we are able to login to the GITEA repository website using root:FaH@3L>Z3})zzfQ3

Going to the explore page we can see that one of these, Key Management, is archived and we can investigate further.

Looking through the commits of the EC2.PHP file that revealed credentials previously shows us historical credentials that used to be here.


When I clicked on the Adding EC2 Key Management Structure commit we find an SSH private key. We can copy this key and use chmod 600 id_rsa to make the key usable with the parameters required and connect to the target directly for an initial foothold.

To laterally move on this machine, we should continue to search through the GITEA website repositories. The LogManagement repository’s createlogs.php file refers to AWS CloudWatch, helping us understand that it is running on localhost:4566

We can confirm that by running ss -ntplu | GREP LISTEN. We can also see that MYSQL is running internally on this machine as well.

AWS CloudWatch is used to monitor, store, and access log files from EC2 instances, AWS CloudTrail, etc. We can also see that both utilities aws and awslocal are installed on the target machine.

AWSLOCAL is a utility that is used for interacting with localstack. Local stack is what enables these AWS services to run in a virtual environment, out of the cloud, spun up for our cloud penetration testing purposes labbing.
We can use awslocal to enumerate the CloudWatch logs. Querying logs requires LogGroup and LogStream names. We first need to find the LogGroup name which can be done with the following:

Now we can find the LogStream Name which will allow us to begin querying.

Now we can query the log events

Notice there are two mentions of RotateSecret and RestoreSecret. These are referring to the AWS SecretsManager service. We can enumerate the SecretsManager service by issuing the following command. Then you will see three credentials that we can request from AWS Secretsmanager individually.

Upon request we now have credentials for Albert, David, and John. We can quickly check the /etc/passwd file by specifying the most common shell (note, you shouldn’t just assume bash is the only shell for login like I did here). So DAVID is our most likely target for lateral movement.
We are able to successfully login as the David user.

Inside of David’s home directory we find a projects folder. This includes a servers.enc file. If we run file against it we can see that is is a binary file, and running xxd against it to expose headers that may include an algorithm does not reveal anything.

This is an encrypted file with a specific encryption algorithm. There was a Key Management System repository, we should revisit that. We also could circumvent this and just interact with the AWS Key Management System (KMS) with awslocal and see if we can expose any keys. We are able to do so and get an overwhelming amount.

I referred to IPSEC’s video for bash kung-fu and ran this command to generate a list of keys that is clean.

The walkthrough for this box reveals a really cool way of automating the process of testing IDs found to see what is enabled when there are an excess of keys to test. We can see only two of them are enabled and the the rest are disabled. The base command here is awslocal kms describe-key —key-id $key and we can filter on the state and cut out the rest of the output.

We are able to test against both of these enabled keys. Based on the KeyUsage we can see the purpose of each, digital signing and encryption / decryption. So we have the means to decrypt that server.enc file now.

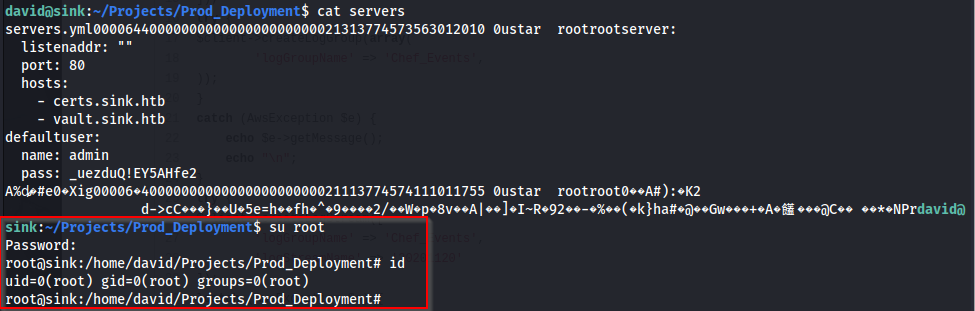
We are able to decrypt the servers.enc file now using the context above to build the below command. That will output base64 formatted data. We are then able to decode that base64 data and save it to a file. Then we can see that is a GZIP compressed file. We can unzip this and cat the contents of the file.


We can now test this password we just acquired against the ROOT account and we will have successfully rooted SINK.